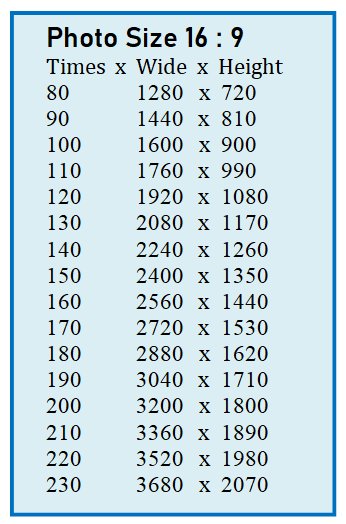
All my photos are edited and sized to fit my screen 1336 x 768 or a derivative thereof (16:9)
And up until now they have displayed at full screen in the windows 10 photo viewer.
They are also perfect to be shown on my TV.
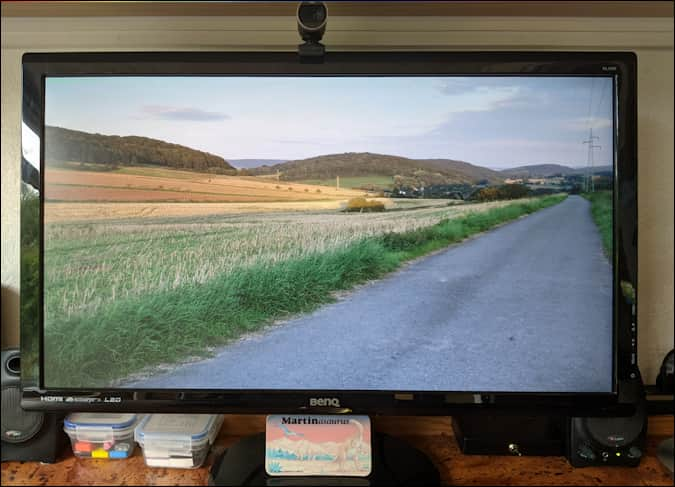
But recently, when I put them in my win 10 photo viewer they have a white border around the outside instead of showing wall to wall… I have tried all the usual fixes with no success…They still view perfectly on the TV so does anyone know why it has suddenly changed on my laptop? And is there a solution? It’s really annoying!
It does the same on my computer, so it looks to be a general thing (except it’s a black border because I have the photo viewer set to the dark theme). The photo I’m opening is 1920 x1080 pixels - screen resolution the same, so the photo should fill the screen when the Full Screen option is chosen. It doesn’t. I’d recommend a different image viewer. FastStone is very good.
You normally get borders if the aspect ratio of the image is different to the aspect ratio of the monitor/display or if the UI adds elements that block part of the screen (eg a toolbar at the top or side).
It sounds as if OGF had the pixel size of the photo set to that of the monitor’s native resolution and that the monitor is set to its native resolution. The photo I resized as a test to 1920 X 1080 (my monitor’s native resolution) displays with a border, all options tried. If it has been OK in the past, perhaps something changed in the W.10 photo viewer. An update springs to mind.
Thanks Azz and Mart…
No Azz there are no toolbars showing after I click on the full screen option…
And the photos are all cropped to same dimensions as the screen ratio i.e. 19:9 and they still show full screen on the Telly which is the same screen ratio.
This problem has appeared on my laptop running Windows 10 in the last month because all my previous photos cropped to the same size and used to show full screen, now have the annoying white border…
Does the image look stretched on the TV? It’s possible either the TV or monitor was stretching the image to fit and that they weren’t the same aspect ratio after all.
I know many monitors are 1920 x 1200, intended for 1080p (1920x1080) work - so that toolbars etc can be on screen while still leave room for a full 1080p picture…
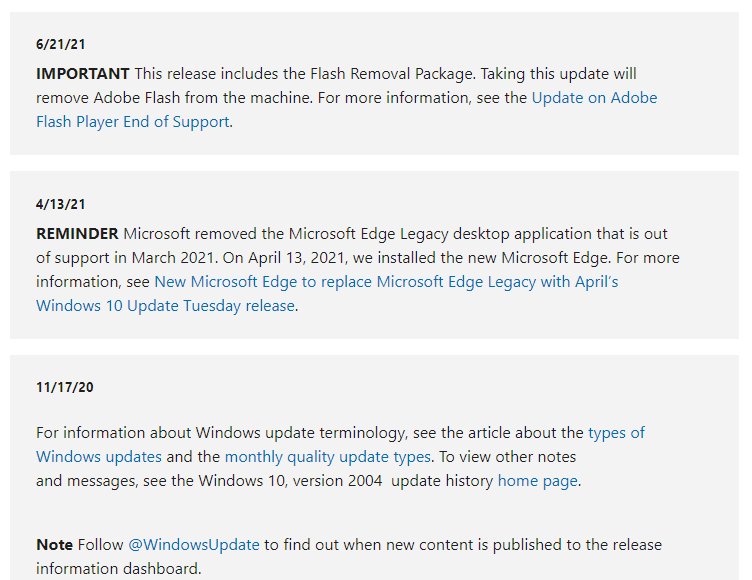
Here is a screenshot of microsoft updates, and I notice that a new microsoft edge was installed, my photos have been displayed on the microsoft photo viewer…Could this be when the white border was added?
And looking at that photo, it appears Microsoft thinks their UI is more important than your photo - and feels the border is acceptable so they can leave room for that little icon in the bottom right (you might find there is a shortcut to go ‘full fullscreen’ where it hides all UI elements - might be worth a google - just looked and it seems lots of other people have the same issue: microsoft photo app problem - Microsoft Community).
That photo has the same border I can see on a test image.
Don’t forget FastStone Image Viewer. Quick full screen image viewing. This image viewer/processor has been around for years and has a good reputation. It’s on a par with Irfanview, another good image viewer/processor. FastStone is better in my opinion.
@Azz Thanks Azz, that is exactly the trouble I’ve been having, and it seems I’m not the only one…I’m getting so fed up with microsoft tinkering about with stuff that used to work perfectly…Damn those updates!..
Thanks for the compliment also Azz, I’ve been the same shape and weight since I left school…I suppose all the running I’ve done over the years has helped…
Thanks @mart going to give FastStone a try, so thanks for the heads up… I’m getting so fed up with microsoft interfering and changing stuff, it’s getting so I have to spend lots of time figuring out how to do simple jobs because things are not how I left them…
I think MS might be good at supplying the operating system …and even some of the apps are OK. Third party ones are often better though.
If you set FastStone as the default viewer, then double-clicking on an image will open it at the pixel size that it is. If that size is the resolution size of the screen, the image will fill it.
It does quite a bit more than quickly display an image. Once installed and showing an image, try a mouseover or a touch to the sides, top and bottom of the screen. Lots of functions available. To close the viewer, mouseover the top of the screen for the ‘X’ or right-click in the Window and choose ‘Terminate the Application’.
Try using buttons ALT and Enter together. Don’t know about with photos but shooting video in 4k and displaying on a 4K monitor does fill the screen without the black sides
Thanks @realspeed I gave it a try but with no success, it just brought up the properties of the shot taken. Still useful to know though. The link that Azz posted above explains what the problem is, and there are lots more users suffering the same problem. Apparently it all went wonky after an update from microsoft…
To anyone that might be interested, I’ve found a fix for the problem, it’s not perfect, but you can view your photos in full screen mode. Open your image in the microsoft photo viewer, click on the three dots in the top right corner (menu) and select ‘Slideshow’…the photo will show in full screen with no border but will flash by probably faster than you would like. By operating the back and forward arrows on your keyboard you can delay the time that the photo appears.
The Windows Photo Viewer is the default program for opening image files on Windows PCs. When the program opens a photo, the image fills the window, and you can use the zoom feature to enlarge it further. The program’s interface will remain, keeping you from viewing the photo in fullscreen. To fill the entire screen, view the photo as part of a slideshow. If the slideshow contains no other photo, it will show a single fullscreen image.
1
Navigate to the photo’s location on your computer.
2
Press “Ctrl-Shift-N” to create a new folder.
3
Click the photo and drag it to the new folder.
4
Double-click the folder to open it.
5
Double-click the photo to open it with Windows Photo Viewer.
Ah yes got you @realspeed but just a couple of points, every so many seconds it blanks out as the slideshow wants to move to the next shot but it can’t, and I wouldn’t be able to see the whole album without making a file for each photo…

 I have tried all the usual fixes with no success…They still view perfectly on the TV so does anyone know why it has suddenly changed on my laptop? And is there a solution? It’s really annoying!